

One small annoyance when using a Raspberry Pi is that a cooling fan connected directly to the 5V pins will keep spinning even after the system is shut down. This happens because the 5V rail remains powered as long as the Raspberry Pi is plugged in.
In this guide, I’ll show you a simple and elegant solution using just two components: a 2N2222 transistor and a 1kΩ resistor. No external power supply, no relays, and no complex setup.
Components Required
- 1× 2N2222 (or 2N2222A) NPN transistor
- 1× 1kΩ resistor
- 1× 5V fan (or a 12V fan running at 5V for quieter operation)
- Raspberry Pi (any model with GPIO)
- Jumper wires
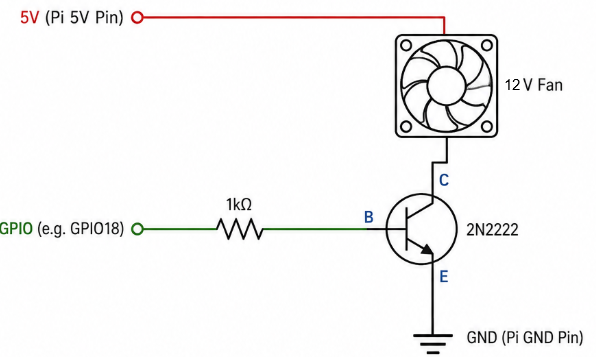
Schematic
The circuit is a simple low-side switch controlled by a GPIO pin.
Connections:
- Fan positive (+) → Raspberry Pi 5V pin (Pin 2 or 4)
- Fan negative (–) → Collector (C) of 2N2222
- Emitter (E) → Raspberry Pi GND
- Base (B) → GPIO pin through 1kΩ resistor
How It Works
The 2N2222 transistor acts as a switch controlled by the Raspberry Pi.
When the Raspberry Pi is running:
- The GPIO pin outputs HIGH (3.3V)
- A small current flows through the 1kΩ resistor into the transistor base
- The transistor turns ON
- The fan gets connected to ground and starts spinning
When the Raspberry Pi is shut down:
- GPIO pins go LOW or high-impedance
- No current flows into the base
- The transistor turns OFF
- The fan stops spinning
This means your fan will automatically turn off when the Raspberry Pi shuts down — exactly what we want.
Why This Approach Is Great
- ✅ No external power supply required
- ✅ Very simple (only 2 components)
- ✅ Silent (no relay clicking)
- ✅ Reliable and efficient
- ✅ Uses standard, cheap components
Important Notes
- The GPIO pin does not power the fan — it only controls the transistor
- The fan is still powered directly from the Raspberry Pi’s 5V rail
- Make sure your fan does not draw too much current (most small fans are fine)
- Double-check transistor pinout (Emitter, Base, Collector) before connecting
Conclusion
This is one of those small upgrades that makes a big difference in everyday use. With just a transistor and a resistor, you can make your Raspberry Pi setup cleaner, quieter, and more power-efficient.
If you’re building a custom enclosure, handheld device, or mini PC, this is almost a must-have trick.
Happy hacking! 🚀